Cosmostreamer for DJI Fly drones
Product page
http://cosmostreamer.com/products/djiflydrones/
Supported Drones
Any drone which work with DJI Fly application and DJI RC-N1 controller.
DJI RC and DJI RC2 are not supported!
- DJI Mini 2
- DJI Mini 3
- DJI Mini 3 Pro
- DJI Mavic 3
- DJI Mavic 3 Pro
- DJI Air 2S
- DJI Mavic Air 2
Hardware
Cosmostreamer for DJI Fly drones can work on these boards:
Raspberry Pi 4B
Any RAM size. 1Gb, 2Gb, 4Gb, 8Gb.
- Two micro-HDMI outs, only one available for video output
- Analog video out (CVBS, TV-out) in 3.5 mini-jack
- DSI display may be used. If DSI display connected - video output only on this display.
- Wi-Fi 2.4/5 GHz
- Ethernet 10/100/1000 Mbit/s
- 2 USB 2.0 ports + 2 USB 3.0 ports
- 1 USB-C port (used for DJI RC-N1 connection)
Installing the Cosmostreamer firmware
- Get a blank microSD card of 8GB or larger. Insert the microSD card into the card reader
- Download ZIP-archive with firmware content
- Extract .img file from downloaded ZIP archive
- Use Win32DiskImager on Windows or Balena Etcher on Mac and write .img file on microSD card
- Insert the microSD card into the Raspberry Pi
- If you have a monitor or a TV with HDMI input - plug it to the Raspberry Pi 4B HDMI-0 port (nearest to USB-C port)
- Plug a standard USB power supply or powerbank to the Raspberry Pi (go to chapter Power for Raspberry Pi). Raspberry Pi must start booting. A couple of reboots may be during the first boot process.
Power for Raspberry Pi
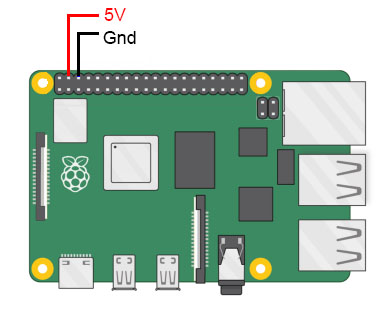
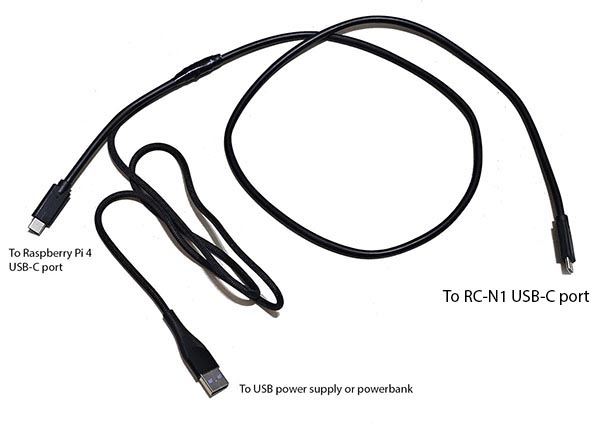
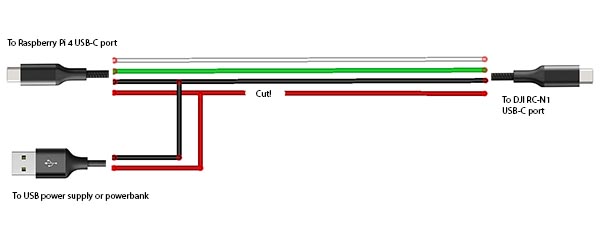
For using with DJI RC-N1 Raspberry Pi 4 must be powered ONLY from GPIO or from PoE or via USB-C port with custom cable.
Power with GPIO (pins)
Use any USB cable, need to cut it and connect to the RPI only 2 wires - Red (5V) and Black (Gnd). Then you can use it with any standard USB power supply or powerbank.

Power with USB-C port
USB-C port on Raspberry Pi 4 is busy by DJI RC-N1 connection, so need to made a custom USB cable with additional part for power.


Network connection
Ethernet
Connect Ethernet cable to the Raspberry Pi Ethernet port at one side and home router or PC/Mac Ethernet port on another side
Wi-Fi
Connect your PC/Mac or smartphone to Wi-Fi network cosmostreamer, password 1234512345
Settings and controls
Browser
Also you could open Cosmostreamer web admin page in browser
http://192.168.50.1
http://my.cosmostreamer.com
http://cosmostreamer.local
Windows application
Download, install and run CosmoViewerNG application.
Mac application
Download, install and run CosmoViewerNG application.
Firmware update
- Run CosmoViewerNG for Win or for Mac or open web page and then open device settings, chapter "System"
- Download the Latest firmware update file
- Choose downloaded update file (with .csuf extension) in "Firmware update" field and press "Upload file" button
- Raspberry Pi must goes to reboot automatically after update installed
Changing camera type
In Cosmostreamer system terminology, a camera is any device that Cosmostreamer can work with. DJI Pocket, DJI Osmo, Goggles - this all a "camera".
MicroSD image with Cosmostreamer configured for "DJI Goggles2/Integra" by default, so needed to change a "camera type".
- Open device settings in CosmoViewerNG application or in web interface
- Go to chapter "Info"
- Choose camera type "DJI Fly drones"
- Don't forget to click "Save" button.