Difference between revisions of "Cosmostreamer for DJI Go4 drones"
| Line 113: | Line 113: | ||
Just connect any Android smartphone to any of four USB-A ports on Raspberry Pi. DJI Go4 application will be auto started. | Just connect any Android smartphone to any of four USB-A ports on Raspberry Pi. DJI Go4 application will be auto started. | ||
<br><br><br> | <br><br><br> | ||
==Downloads== | |||
*[https://cosmostreamer.com/apps/cosmostreamer-ng/download/cosmostreamer-ng.sdcard.zip Full microSD image with firmware]<br> | |||
*[https://cosmostreamer.com/apps/cosmostreamer-ng/download/cosmostreamer-ng.csuf Latest firmware update file]<br> | |||
*[https://cosmostreamer.com/apps/cosmostreamer-ng/download/changelog.txt Changelog file]<br> | |||
*[https://cosmostreamer.com/apps/cosmostreamer-ng/download/ All files]<br> | |||
<br><br><br> | |||
==FAQ== | |||
===Can I just unplug the power cable from the box?=== | |||
Yes, the file system on the microSD is in read-only mode, so you can unplug the power cable without any problem | |||
[[Category:Drones]][[Category:FPV]] [[Category:DJI]] | |||
Latest revision as of 16:50, 13 December 2023
Product page
http://cosmostreamer.com/products/djigo4drones/
Demo video
Supported Drones
Any drone which work with DJI Go4 application.
- DJI Phantom 4 Pro V2.0
- DJI Mavic Pro
- DJI Macic 2 Pro
- DJI Mavic 2
- DJI Inspire 2
Hardware
Cosmostreamer for DJI Go4 drones can work on these boards:
Raspberry Pi 4B
Any RAM size. 1Gb, 2Gb, 4Gb, 8Gb.
- Two micro-HDMI outs, both can be used for video output
- Analog video out (CVBS, TV-out) in 3.5 mini-jack
- DSI display may be used. If DSI display connected - video output available only on this display + HDMI-0 port.
- Wi-Fi 2.4/5 GHz
- Ethernet 10/100/1000 Mbit/s
- 2 USB 2.0 ports + 2 USB 3.0 ports
- 1 USB-C port (used for drone controller connection)
Installing the Cosmostreamer firmware
- Get a blank microSD card of 8GB or larger. Insert the microSD card into the card reader
- Download ZIP-archive with firmware content
- Extract .img file from downloaded ZIP archive
- Use Win32DiskImager on Windows or Balena Etcher on Mac and write .img file on microSD card
- Insert the microSD card into the Raspberry Pi
- If you have a monitor or a TV with HDMI input - plug it to the Raspberry Pi 4B HDMI-0 port (nearest to USB-C port)
- Plug a standard USB power supply or powerbank to the Raspberry Pi (go to chapter Power for Raspberry Pi). Raspberry Pi must start booting. A couple of reboots may be during the first boot process.
Power for Raspberry Pi
For using with DJI Go4 drones controllers Raspberry Pi 4 must be powered ONLY from GPIO or from PoE or via USB-C port with custom cable.
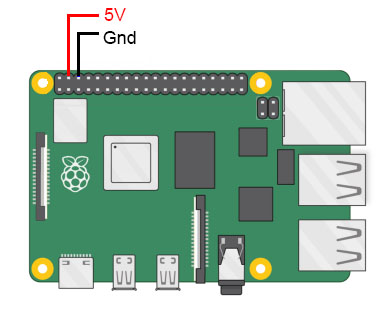
Power with GPIO (pins)
Use any USB cable, need to cut it and connect to the RPI only 2 wires - Red (5V) and Black (Gnd). Then you can use it with any standard USB power supply or powerbank.
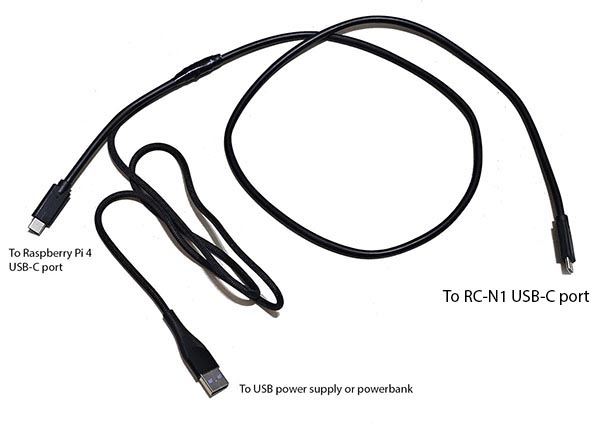
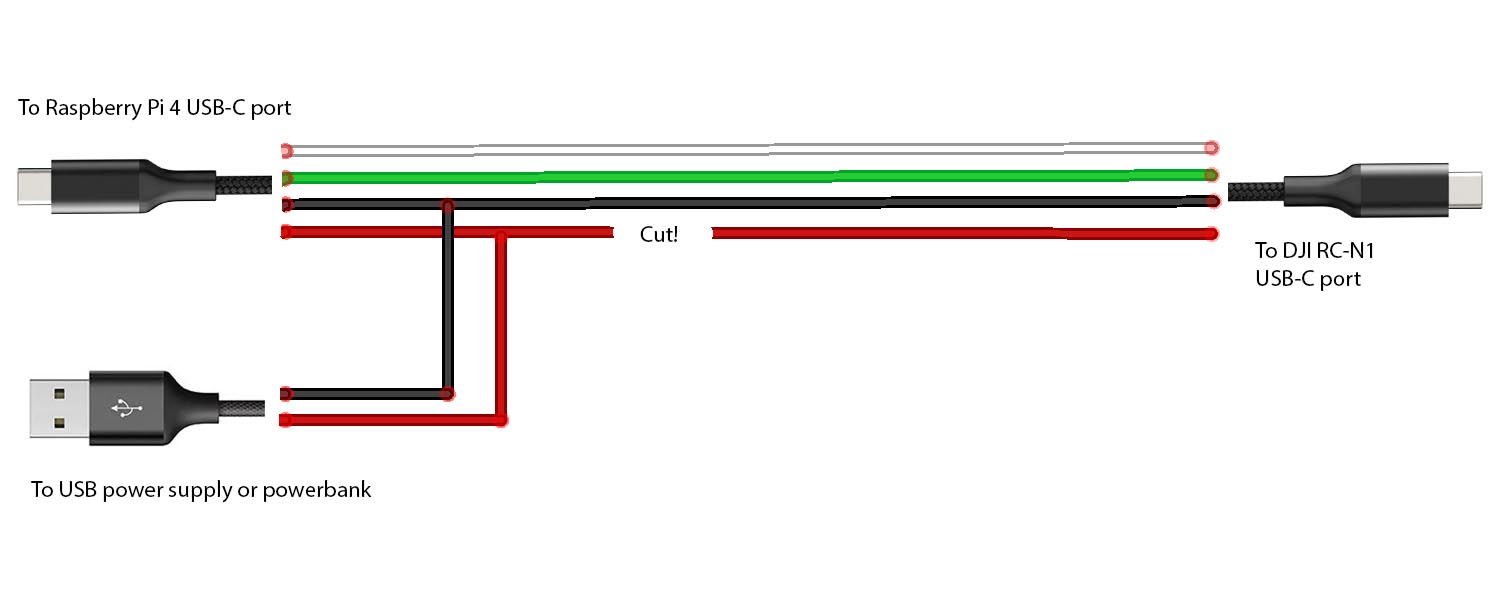
Power with USB-C port
USB-C port on Raspberry Pi 4 is busy by DJI drone controller connection, so need to made a custom USB cable with additional part for power.
Network connection
Ethernet
Connect Ethernet cable to the Raspberry Pi Ethernet port at one side and home router or PC/Mac Ethernet port on another side
Wi-Fi
Connect your PC/Mac or smartphone to Wi-Fi network cosmostreamer, password 1234512345
Settings and controls
Browser
Also you could open Cosmostreamer web admin page in browser
http://192.168.50.1
http://my.cosmostreamer.com
http://cosmostreamer.local
Windows application
Download, install and run CosmoViewerNG application.
Mac application
Download, install and run CosmoViewerNG application
Firmware update
- Run CosmoViewerNG for Win or for Mac or open web page and then open device settings, chapter "System"
- Download the Latest firmware update file
- Choose downloaded update file (with .csuf extension) in "Firmware update" field and press "Upload file" button
- Raspberry Pi must goes to reboot automatically after update installed
Changing camera type
In Cosmostreamer system terminology, a camera is any device that Cosmostreamer can work with. DJI Pocket, DJI Osmo, Goggles - this all a "camera".
MicroSD image with Cosmostreamer configured for "DJI Goggles2/Integra" by default, so needed to change a "camera type".
- Open device settings in CosmoViewerNG application or in web interface
- Go to chapter "Info"
- Choose camera type "DJI Go4 drones"
- Don't forget to click "Save" button.
License key
License key is a text string, unique for each Raspberry Pi. Each camera type needs different license keys. It's possible to install multiple amount of license keys on one device and use this device for some camera types, i.e. Pocket Osmo, Pocket 2, and others. Need to buy license for correct operation process.
- Buy license key on a product page
- Make a photo of HDMI display or screenshot of the app with a QR image and send it in email on [email protected] for making a license key
- When you got a license key - use web interface or CosmoViewerNG application, menu "device settings" -> "License" and insert license key into field. And click "Install license" button.
Controller connection
Cosmostreamer may be connected to DJI drone controller only with USB. Use USB-C port on Raspberry Pi4 and USB port which is usually used for smartphone connection.
Smartphone connection
Just connect any Android smartphone to any of four USB-A ports on Raspberry Pi. DJI Go4 application will be auto started.
Downloads
FAQ
Can I just unplug the power cable from the box?
Yes, the file system on the microSD is in read-only mode, so you can unplug the power cable without any problem