Cosmostreamer for DJI SDR with DJI gimbals
Product page
https://cosmostreamer.com/products/djisdr/
Video reviews
No reviewes yet.
Supported Gimbals
All DJI gimbals which officially supported by DJI SDR. Tested with DJI RS4 and DJI RS4 Pro.
Hardware
Cosmostreamer for DJI SDR can work on these boards:
Raspberry Pi 4B
Any RAM size. 1Gb, 2Gb, 4Gb, 8Gb.
- Two micro-HDMI outs
- Analog video out (CVBS, TV-out) in 3.5 mini-jack
- DSI display may be used. If DSI display connected - only HDMI-0 may be used.
- Wi-Fi 2.4/5 GHz
- Ethernet 10/100/1000 Mbit/s
- 2 USB 2.0 ports + 2 USB 3.0 ports
- 1 USB-C port (used for DJI SDR connection)
Raspberry Pi 5
Not supported
Without a hardware H264 video decoder this is a bad choice for using with Cosmostreamer.
Raspberry Pi Zero/ZeroW
Not supported due too slow single-core CPU
Raspberry Pi Zero2W
Not tested but should work
- Mini-HDMI port
- Wi-Fi 2.4GHz/5GHz
Raspberry Pi 3B/3B+
Not supported due USB incompatibility
Installing the Cosmostreamer firmware
- Get a blank microSD card of 8GB or larger. Insert the microSD card into the card reader
- Download ZIP-archive with firmware content
- Extract .img file from downloaded ZIP archive
- Use Win32DiskImager on Windows or Balena Etcher on Mac and write .img file on microSD card
- Insert the microSD card into the Raspberry Pi
- If you have a monitor or a TV with HDMI input - plug it to the Raspberry Pi 4B HDMI-0 port (nearest to USB-C port)
- Plug a standard USB power supply or powerbank to the Raspberry Pi. Raspberry Pi must start booting. A couple of reboots may be during the first boot process. This is just for initial Cosmostreamer's set up. For the normal Raspberry Pi power when DJI SDR is connected use a power scheme from the chapter Power for Raspberry Pi).
- MicroSD image contains not the latest firmware version, so don't forget to update firmware to the latest, see chapter Firmware update).
Power for Raspberry Pi
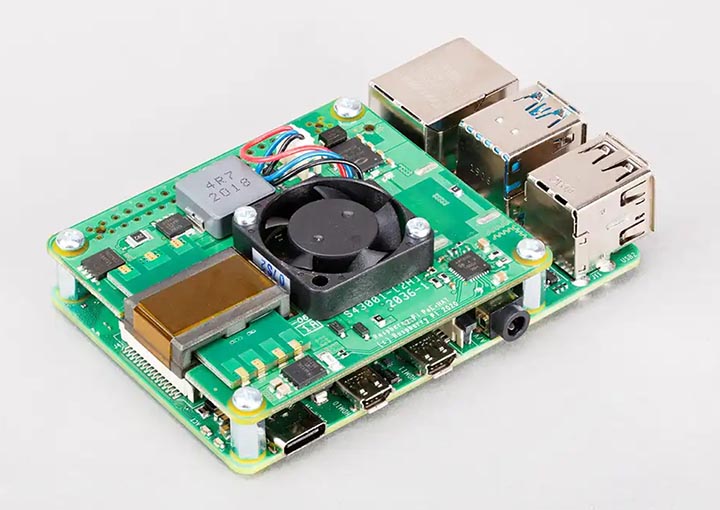
For using Raspberry Pi 4 with DJI SDR it must be powered via GPIO or from PoE.
Power with GPIO (pins)
The best way. Works always.
Use any USB cable, need to cut it and connect to the RPI only 2 wires - Red (5V) and Black (Gnd). Then you can use it with any standard USB power supply or powerbank with an USB-A port. Power supply or powerbank with USB-C port usually does not output 5V by default, so it can't be used without adding of negotiation resistors or PD-trigger scheme, so just use USB-A port instead.
With one 5V and one Gnd pin
Minimal variant. But make sure the wires are not too thin, otherwise they may not be able to carry enough current. Recommended wire cross-section: 2.0 mm² or larger.
5V goes to pin 2
GND goes to pin 6 (or any other GND pin, check the Raspberry Pi pinout scheme below)

With two 5V and two Gnd pins
A bit more difficult to connect, but more stable under load. You just need to connect the same wire to two pins. Two pins for 5V and two pins for GND. Recommended wire cross-section: 2.0 mm² or larger.
5V goes to pins 2 and 4
GND goes to pins 6 and 14 (or any other GND pins, check the Raspberry Pi pinout scheme below)

Raspberry Pi 4 pinout

Power with PoE
Need to use PoE Hat or PoE+ Hat
Network connection
Ethernet
Only for Raspberry Pi versions with Ethernet port. Connect Ethernet cable to the Raspberry Pi Ethernet port at one side and home router or PC/Mac Ethernet port on another side
Wi-Fi
Connect your PC/Mac or smartphone to Wi-Fi network cosmostreamer, password 1234512345
USB
It's possible to plug a smartphone to the Cosmostreamer device using a standard USB cable.
From Iphone
1. Plug USB cable from Iphone to one of four USB-A ports on the Raspberry Pi 4. Iphone will show "Trust this computer?" message. Press "Trust".
2. Turn on modem mode on the Iphone.
3. In a browser open http://172.20.10.2
From Android smartphone
Similar to Iphone, but IP address is different for different smartphone models, so no common IP.
Settings and controls
Browser In Wi-Fi Access Point mode
Also you could open Cosmostreamer web admin page in browser
http://192.168.50.1
http://my.cosmostreamer.com
Then click "Device settings" in menu shown by click on Menu icon in right bottom corner.
Browser in WLAN client mode
Open in browser http://cosmostreamer.local
This is dynamical host name so may not work properly if multiple Cosmostreamer devices in the same network or IP changes.
Then click "Device settings" in menu shown by click on Menu icon in right bottom corner.
Browser with Iphone USB modem mode
Open in browser http://172.20.10.2
Then click "Device settings" in menu shown by click on Menu icon in right bottom corner.
Windows application
Download, install and run CosmoViewerNG application.
Mac application
Download, install and run CosmoViewerNG application
Firmware update
Don't skip ths step, because the microSD image does not contains a latest firmware version!
- Run CosmoViewerNG for Win or for Mac or open web page and then open device settings, chapter "System"
- Download the Latest firmware update file
- Choose downloaded update file (with .csuf extension) in "Firmware update" field and press "Upload file" button
- Raspberry Pi must goes to reboot automatically after update installed
Changing camera type
In Cosmostreamer system terminology, a camera is any device that Cosmostreamer can work with. DJI Pocket, DJI Osmo, Goggles - this all a "camera".
MicroSD image with Cosmostreamer configured for "DJI Goggles2/3/Integra/N3" by default, so need to change it to type #31 "DJI SDR":
- Open device settings in CosmoViewerNG application or in web interface
- Go to chapter "Info"
- Choose camera type "DJI SDR (type #31)"
- Disable option "Allow auto detection" if enabled
- Don't forget to click "Save" button.
License key
License key is a text string, unique for each Raspberry Pi. Each camera type needs different license keys. It's possible to install multiple amount of license keys on one device and use this device for some camera types, i.e. Pocket Osmo, Pocket 2, and others. Need to buy license for correct operation process.
- Buy license key on a product page
- Make a photo of HDMI display or screenshot of the app with a QR image and send it in email on cosmostreamer@gmail.com for making a license key
- When you got a license key - use web interface or CosmoViewerNG application, menu "device settings" -> "License" and insert license key into field. And click "Install license" button.
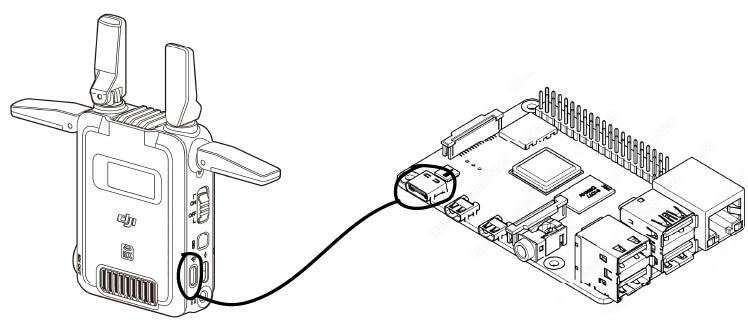
DJI SDR RX connection
Standard USB-C to USB-C cable
Not supported!
Custom USB-C to USB-C cable
Need to use a standard USB-C to USB-C cable but with a cutted power wire (or wires) inside the cable.
Red wire (5V) must be cutted for using with the DJI SDR RX

One side - to the Raspberry Pi 4 USB-C port. Another side - into DJI SDR RX (receiver unit) "Firmware Update and Video Output Port".
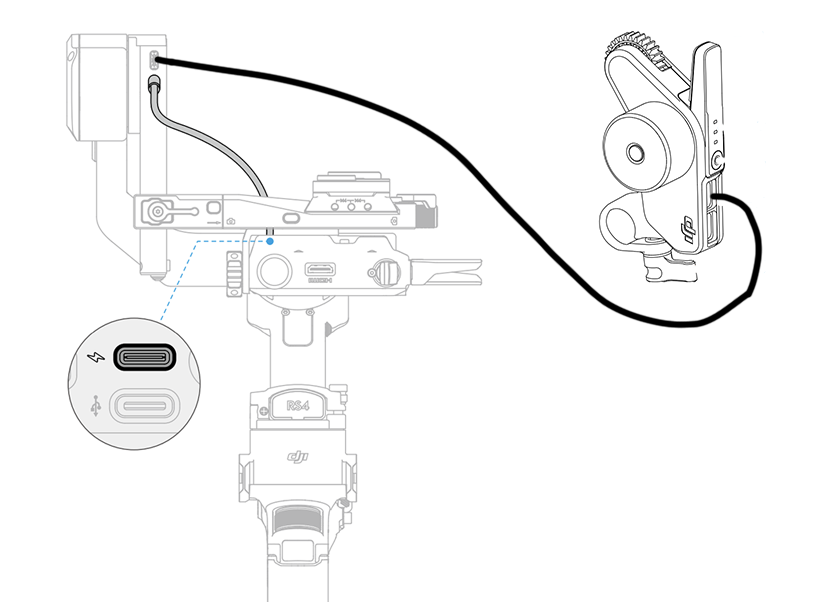
DJI SDR TX connection
Without or with only one focus motor
This is an official DJI connection scheme. Use the camera control cable (USB-C 30cm or any other USB-C to USB-C cable) to connect the video transmission/LiDAR range finder port on the gimbal to the USB-C power and gimbal communication port on the DJI SDR TX (transmitter). This setup allows the gimbal to power the transmitter.
If you want to use a focus motor - use another USB-C to USB-C cable and connect it to the "In" USB-C port on the motor and to the "Focus Motor Port (USB-C)" on the gimbal.
Motor can be ONLY in "Focus" mode to be possible to control it from Cosmostreamer!
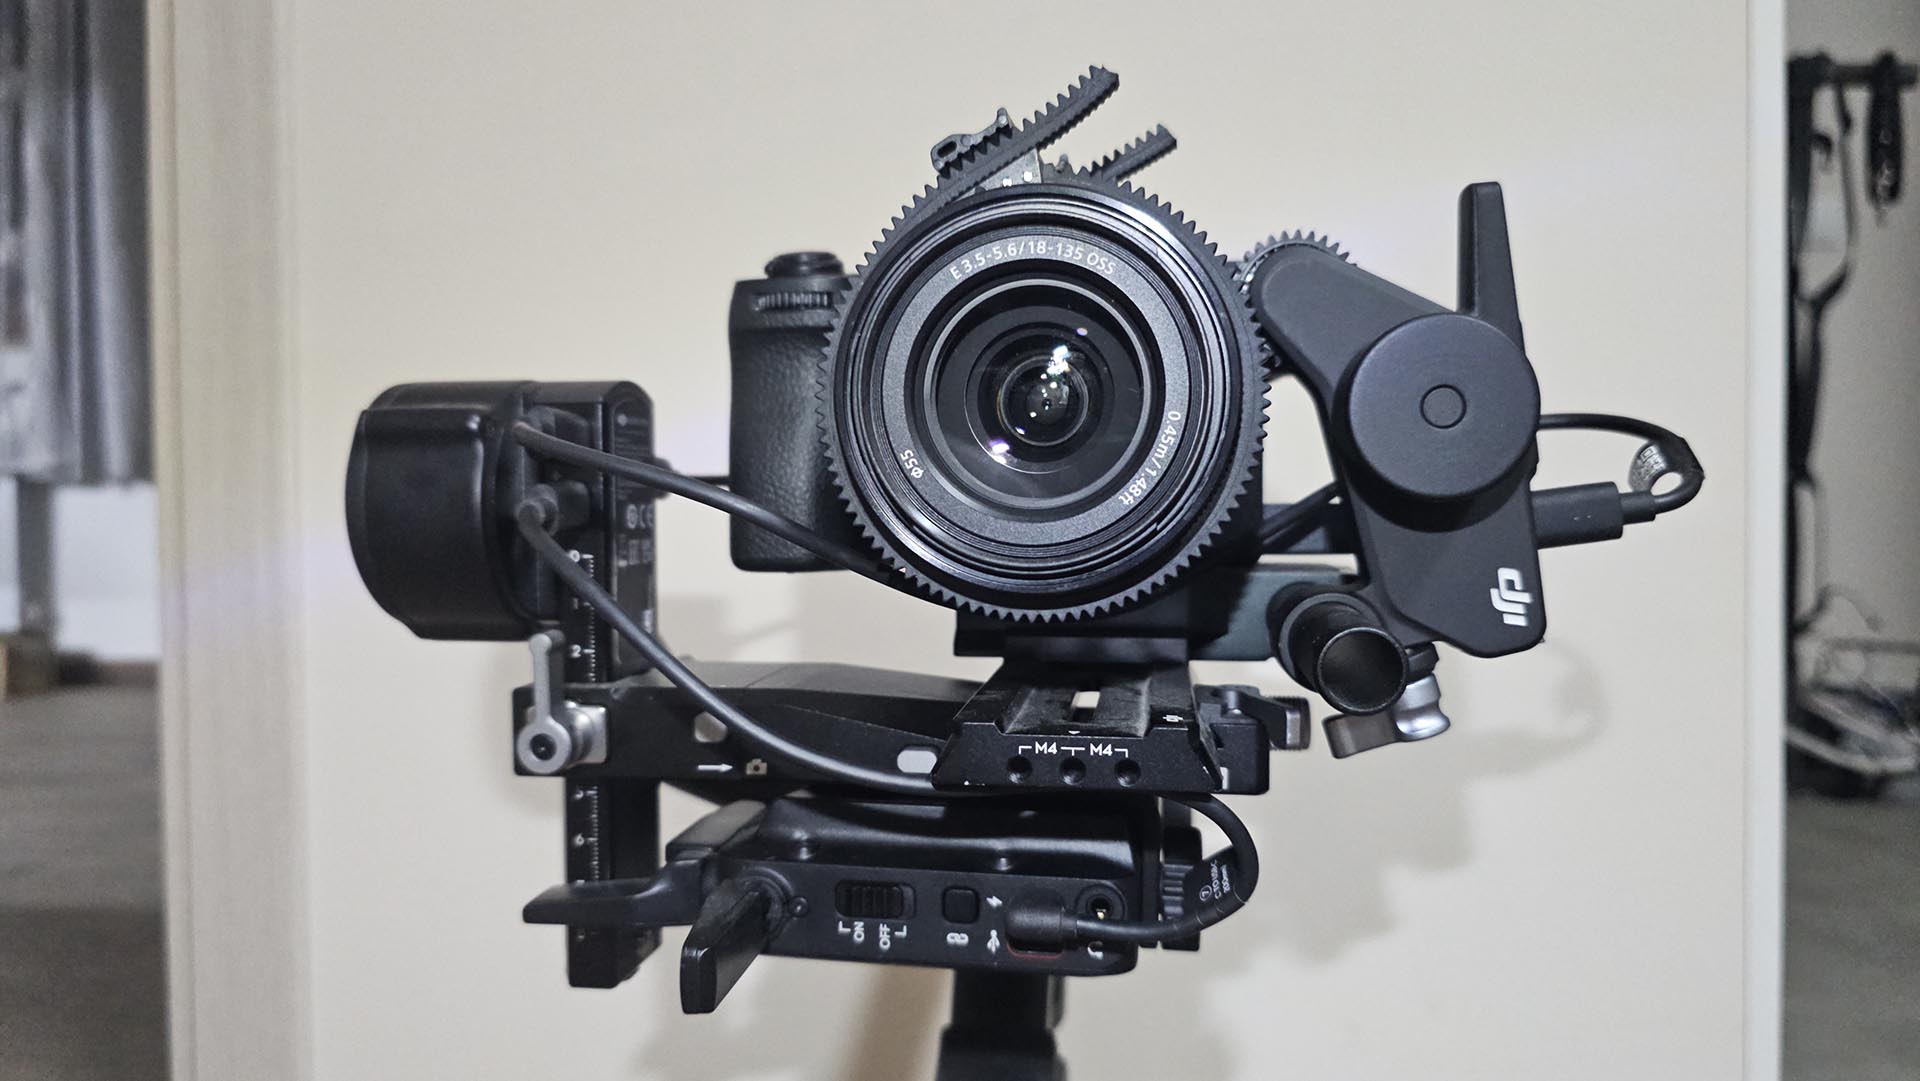
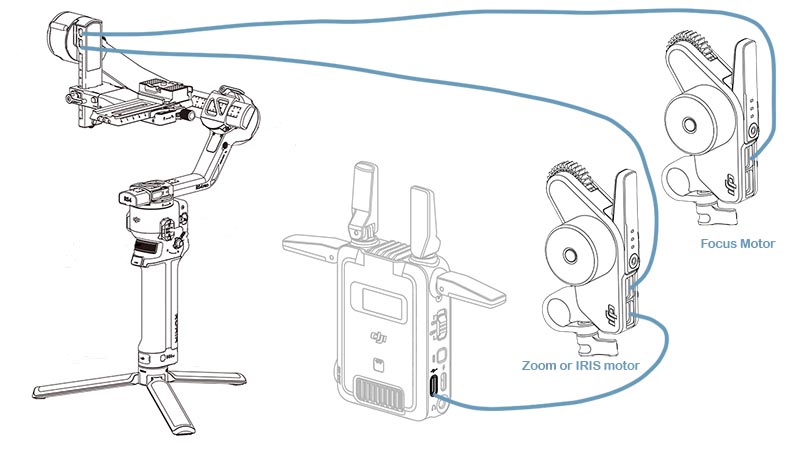
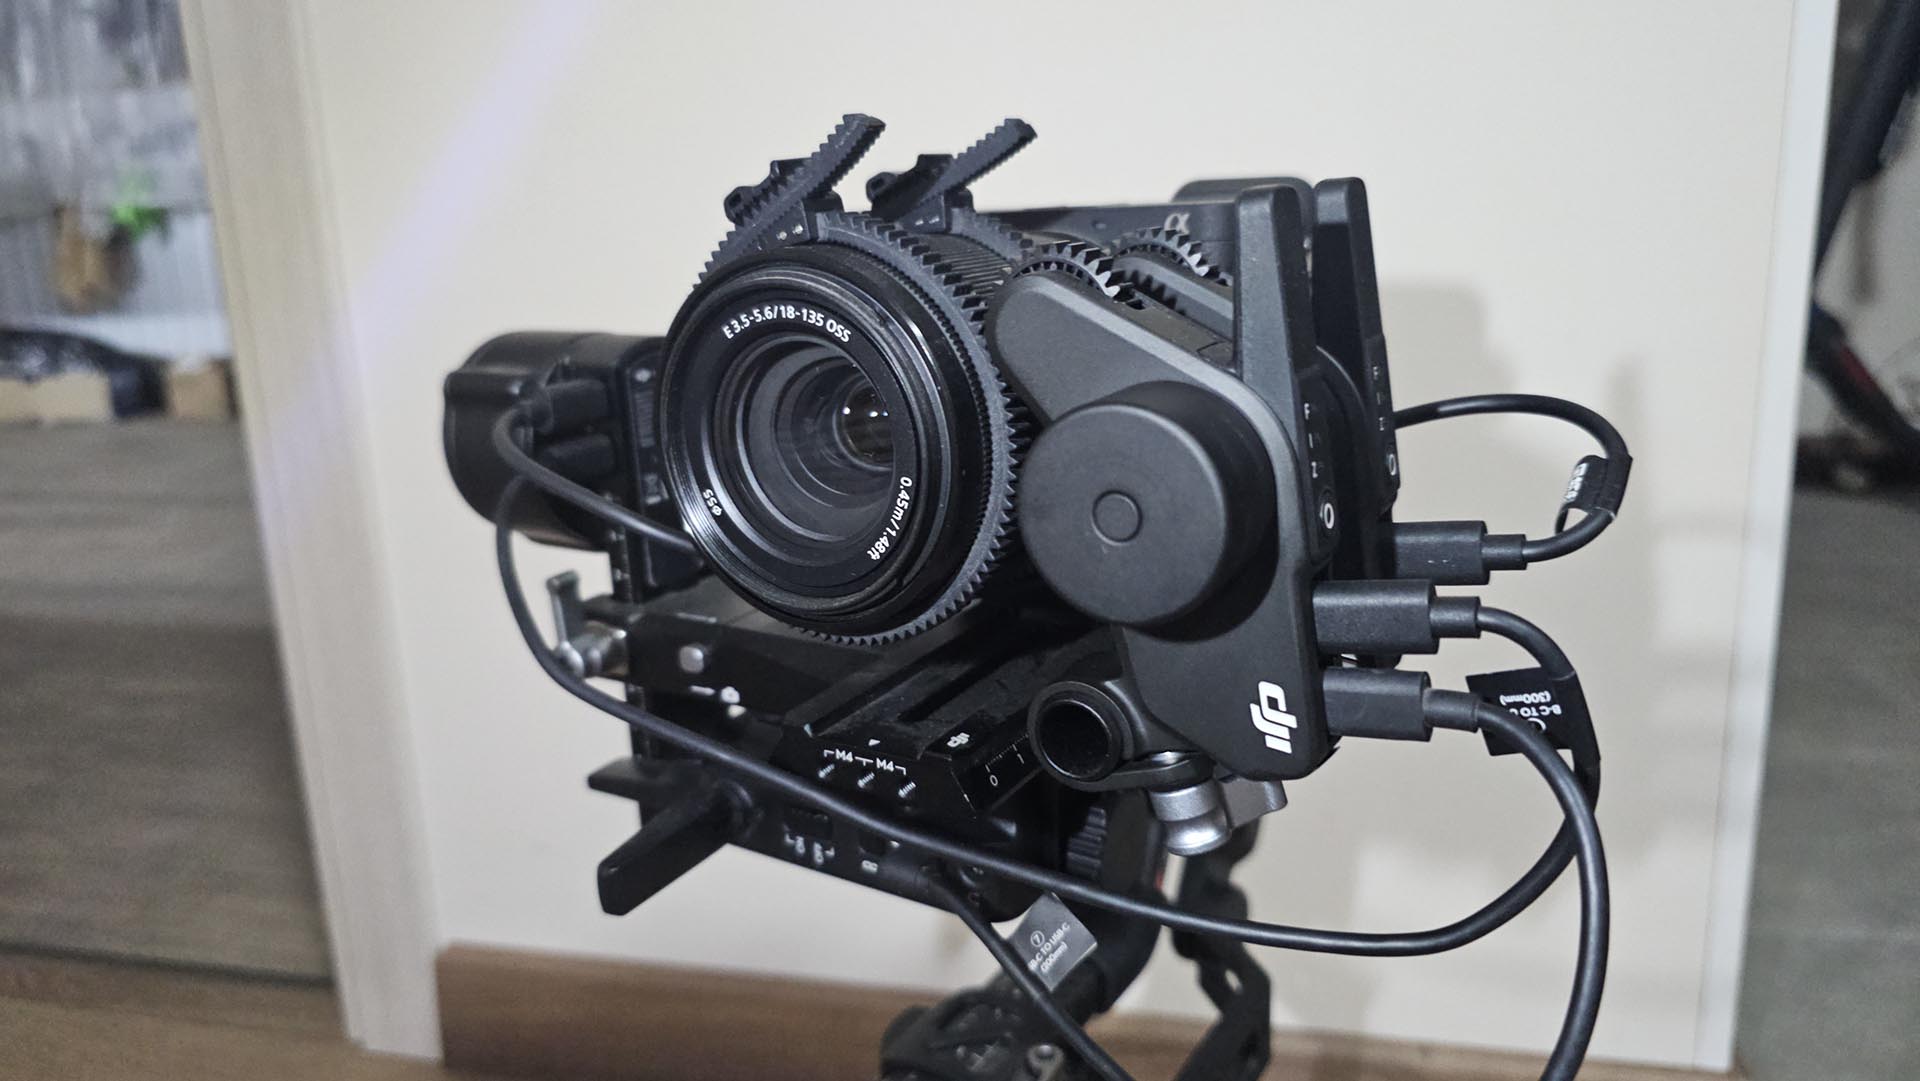
With two motors
Two motors officially supported only by DJI RS4 Pro. But with a connection trick RS4 (not Pro) also works with the two motors perfectly.
To control two motors (e.g., focus and zoom, or focus and IRIS), a special connection trick is required.
Firtst motor - as usual, connect to the "Focus Motor Port (USB-C)" on the gimbal. This motor can be ONLY in "Focus" mode!
Connect a second motor's "In" USB-C port to the video transmission/LiDAR range finder port on the gimbal. Then connect this motor's "Out" USB-C port to the gimbal communication port on the DJI SDR TX (transmitter). I.e. DJI SDR TX will be connected only to the this motor. This motor can be in any mode (Focus, Zoom, IRIS)
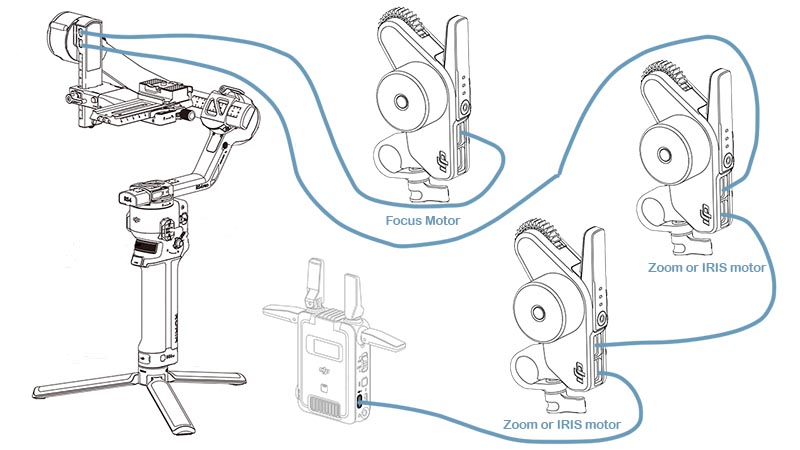
With three motors
Three motors officially supported only by DJI RS4 Pro. But with a connection trick RS4 (not Pro) also should work with the three motors.
To control three motors (e.g., focus, zoom and IRIS), a special connection trick is required.
First motor - as usual, connect to the "Focus Motor Port (USB-C)" on the gimbal. This motor can be ONLY in "Focus" mode!
Connect a second motor's "In" USB-C port to the video transmission/LiDAR range finder port on the gimbal. Then connect this motor's "Out" USB-C port to the third motor's "In" USB-C port. And "Out" USB-C port on this motor - to gimbal communication port on the DJI SDR TX (transmitter). These motors can be in any mode (Focus, Zoom, IRIS)
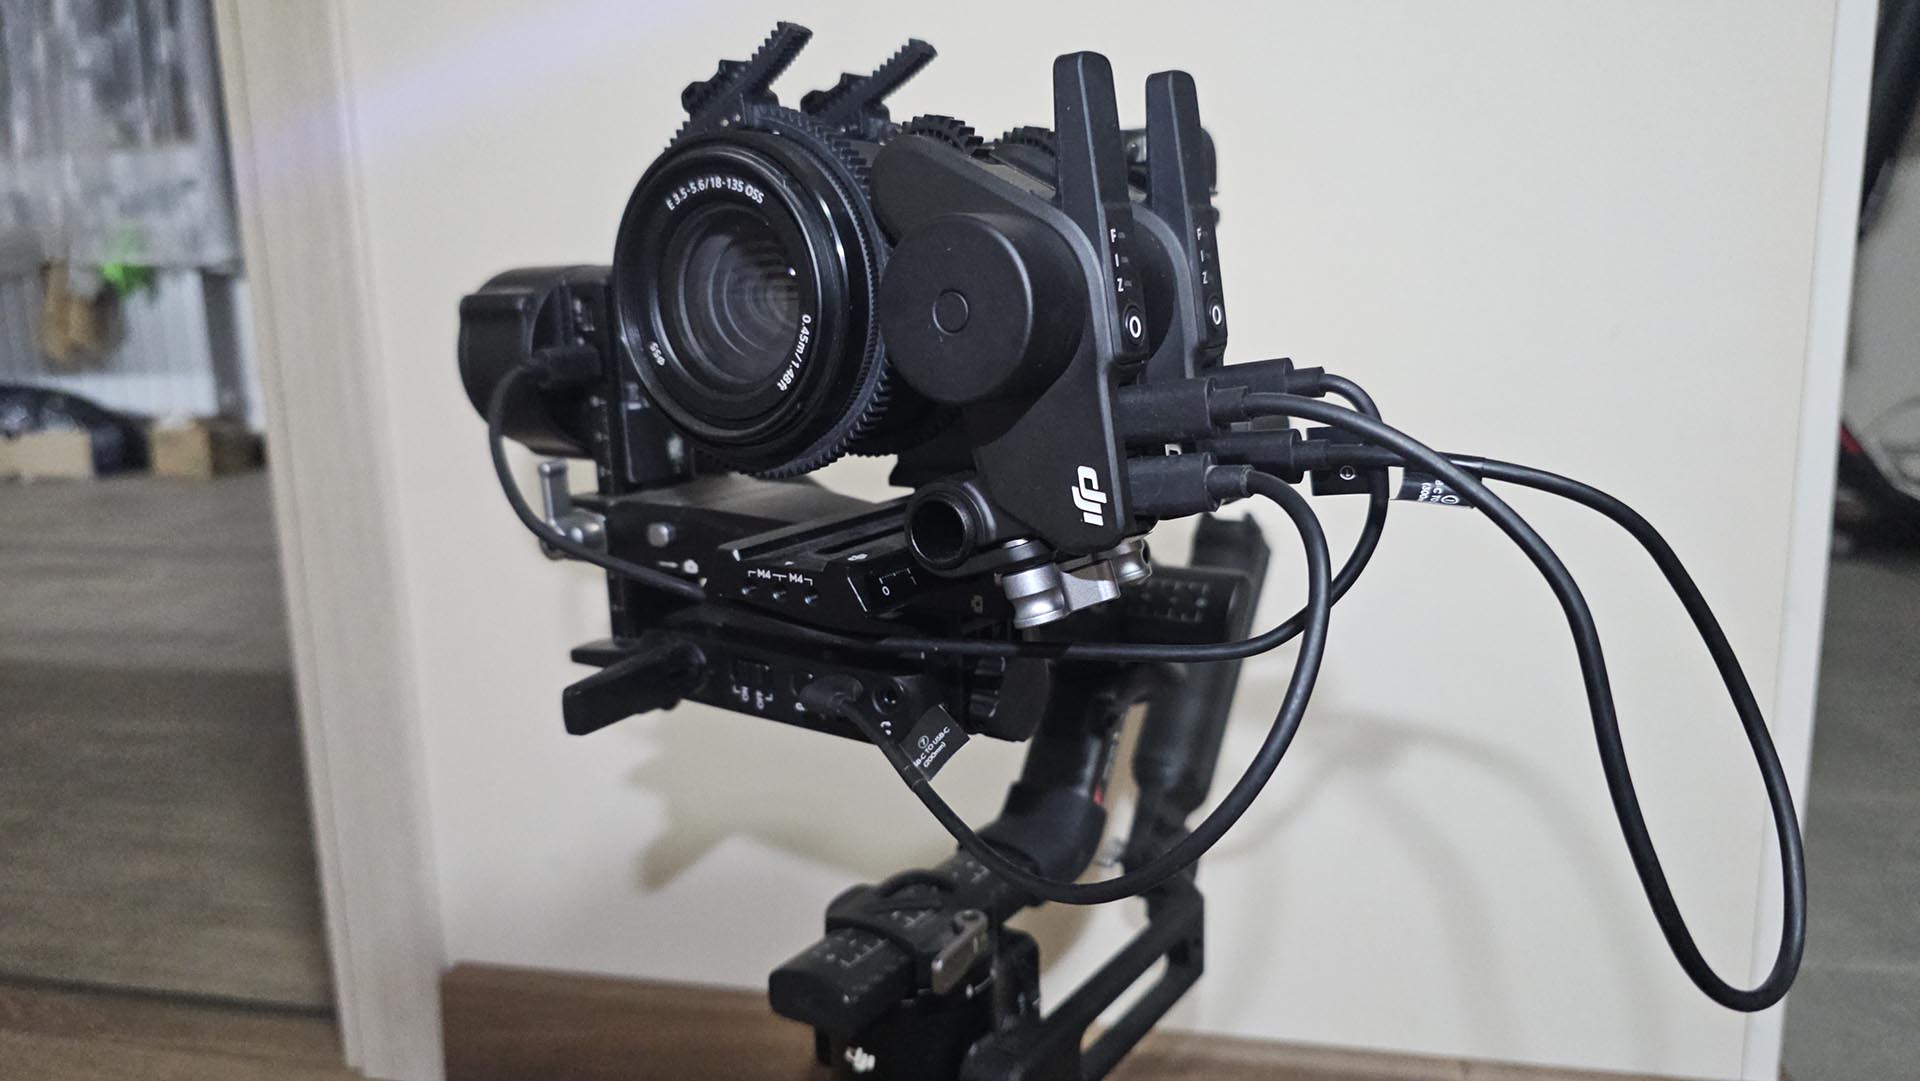
Focus motor is not shown on this photo
CosmoJoy
A tiny device that allows PWM signal output for servo control through DJI SDR. Also it can work as a HID gamepad, that's why it called "CosmoJoy" :-)
Demo: https://www.instagram.com/p/DTYJS4TjOcD/
Hardware
1. Seeed Studio XIAO RP2350
https://www.seeedstudio.com/Seeed-XIAO-RP2350-p-5944.html
2. CAN Bus Breakout Board for Seeed Studio XIAO
https://www.seeedstudio.com/Seeed-Studio-CAN-Bus-Breakout-Board-for-XIAO-and-QT-Py-p-5702.html
XIAO RP2350 Pinout

Assembly
Just insert XIAO RP2350 into the CAN Bus Breakout Board and add 120 OHm resistor between CAN HI and LO contacts.

Firmware upload

1. Insert USB-C cable to the XIAO RP2350 board
2. Press and hold button "B" on the board
3. Connect USB cable to the PC.
4. Release button "B".
5. Board should be detected as USB drive in Windows or Mac OS.
LED indication
State colors:
1. Setup stage - white solid
2. CAN init stage - red solid
3. CAN init failed - pulse red
4. CAN init done - green solid
5. Pulsing green - no CAN connected
6. Blinking green - idle (no commands) but CAN connected
7. Blinking violet - commands coming
8. HID mode not working - yellow LED blinks
9. HID mode works - yellow LED solid ON
Connection to the DJI SDR TX
Use any standard USB cable and cut it on one side. Then connect USB-C connector to the port on the DJI SDR TX. And wires on another side connect to the CAN Bus Breakout Board. Green - to the CAN HI, White - to the CAN Lo.


If you want to use CosmoJoy together with DJI RS4/RS5 - use parallel connection, at the same time to the RS4/RS5 and to the CosmoJoy.
Using as a HID gamepad
Just plug the USB-C port on the XIAO board into a USB port on your PC. Power for the CosmoJoy will go from the USB port.
The device should be detected as a gamepad with the name "CosmoJoy" (Vendor: 239a Product: cafe), but only after pressing any button or moving any axis.
Assign a channels functions like this (just for example):

Demo: https://www.instagram.com/reel/DZYnG3Tsit9/?igsh=MWV6Z3pwamV5N3I5cQ==
Gamepad tester online (works not in all browsers, better to use Chrome) https://gamepad-tester.net/
Using as PWM source
Need to put 5V power to the CosmoJoy. This can be via USB-C port (just connect to the power supply, powerbank, or any 5V source). And also this can be via pins "5V" and "Gnd" (look at the "XIAO RP2350 Pinout" image above).
Pinout:
5V - input power 5 Volts
Gnd - input power Ground
D1 - PWM Out 1 (RC function SDR Aux1)
D2 - PWM Out 2 (RC function SDR Aux2)
D4 - PWM Out 3 (RC function SDR Aux3)
D5 - PWM Out 4 (RC function SDR Aux4)
D6 - PWM Out 5 (RC function SDR Aux5)
Downloads
- Full microSD image with firmware
- Latest firmware update file
- Changelog file
- All files
- Official DJI SDR User Guide
- Official DJI RS4/RS4 Pro User Manual
- DJI Focus Pro User Manual
Demos
https://www.instagram.com/p/DKvd7r-oaQf/
https://www.instagram.com/p/DKW0a3IIcke/
https://www.instagram.com/p/DKSWTNbonjl/
https://www.instagram.com/p/DKKlLjUIEgV/
https://www.instagram.com/p/DBqXTcxuLgJ/
FAQ
What gimbals are supported?
All DJI gimbals which are officially supported buy DJI SDR should work. Tested with DJI RS4 and DJI RS4 Pro.
Can I control a focus motor?
Yes. With a standard USB cables connection from DJI focus motor to RS4 or another DJI Gimbal focus motor works fine.
Can I control additional motors (zoom, IRIS)?
Yes, but need to use a non-standard connection scheme. Read here please: #With_two_motors