Difference between revisions of "CosmoViewerNG for Windows and Insta360 cams"
| (7 intermediate revisions by the same user not shown) | |||
| Line 9: | Line 9: | ||
[[File:Insta360-cams.jpg|700px|none]] | [[File:Insta360-cams.jpg|700px|none]] | ||
==== Video instruction ==== | |||
<youtube>https://youtu.be/wxOBlYtEHEg</youtube> | |||
<br><br> | |||
==== Connection to camera ==== | ==== Connection to camera ==== | ||
| Line 27: | Line 31: | ||
==== Configuring CosmoViewerNG ==== | ==== Configuring CosmoViewerNG ==== | ||
# [https://cosmostreamer.com/wiki/index.php?title=CosmoViewerNG_for_Windows#Downloads Download CosmoViewerNG for Windows] | |||
# Run CosmoViewerNG application on PC<br> | # Run CosmoViewerNG application on PC<br> | ||
# Click "Application settings" icon (3rd icon from bottom in left panel)<br> | # Click "Application settings" icon (3rd icon from bottom in left panel)<br> | ||
| Line 61: | Line 66: | ||
==== RTMP live stream ==== | ==== RTMP live stream ==== | ||
For example, live stream on Youtube in 4K resolution (3840x2160). | For example, live stream on Youtube in 4K resolution (3840x2160). | ||
<br> | |||
<youtube>https://youtu.be/ksKmp-wRZDM</youtube> | |||
<br> | |||
# Configure Youtube live stream in Youtube Studio, create (or modify current) stream key with 4K resolution and bitrate 13-30 Mbit/s | # Configure Youtube live stream in Youtube Studio, create (or modify current) stream key with 4K resolution and bitrate 13-30 Mbit/s | ||
| Line 67: | Line 75: | ||
# Go to camera settings, tab "Stitching" and enable stitching. Use default params. | # Go to camera settings, tab "Stitching" and enable stitching. Use default params. | ||
# Youtube don't like native video resolution with 2:1 aspect ratio, so turn on "Resize output video" option and choose resizing resolution option 3840x2160. | # Youtube don't like native video resolution with 2:1 aspect ratio, so turn on "Resize output video" option and choose resizing resolution option 3840x2160. | ||
# Set output bitrate to | # Set output bitrate to 15000 (15 Mbit/s). You could use lower or greater value, 15000 is just for example. | ||
# Enable "HW acceleration" option (only if you have Nvidia based graphics card) [[File:Cosmoviewerng-insta360-9.jpg|700px|none]]<br> | # Enable "HW acceleration" option (only if you have Nvidia based graphics card) [[File:Cosmoviewerng-insta360-9.jpg|700px|none]]<br> | ||
# In tab "Video output" set "Camera video stream format" to "3840x1920@30", disable "CosmoViewerNG app" option and enable "UDP stream", set Host 127.0.0.1 and Port 5000. Click "Save" [[File:Cosmoviewerng-insta360-10.jpg|700px|none]]<br> | # In tab "Video output" set "Camera video stream format" to "3840x1920@30", disable "CosmoViewerNG app" option and enable "UDP stream", set Host 127.0.0.1 and Port 5000. Click "Save" [[File:Cosmoviewerng-insta360-10.jpg|700px|none]]<br> | ||
| Line 76: | Line 84: | ||
# Click "Save" | # Click "Save" | ||
# Now you can turn on/off streaming by clicking checkbox "Enabled". Yes, not usefull, i'll add streaming panel on main screen, but later. | # Now you can turn on/off streaming by clicking checkbox "Enabled". Yes, not usefull, i'll add streaming panel on main screen, but later. | ||
<br><br> | |||
==== Hardware ==== | ==== Hardware ==== | ||
Insta360 cams already supported in Cosmostreamer on Raspberry Pi and Nvidia Jetson. On Raspberry Pi | Insta360 cams already supported in Cosmostreamer on Raspberry Pi and Nvidia Jetson. On Raspberry Pi stitching does not works, on Jetson - should work but not tested yet. | ||
<br><br> | <br><br> | ||
Latest revision as of 13:52, 3 June 2022
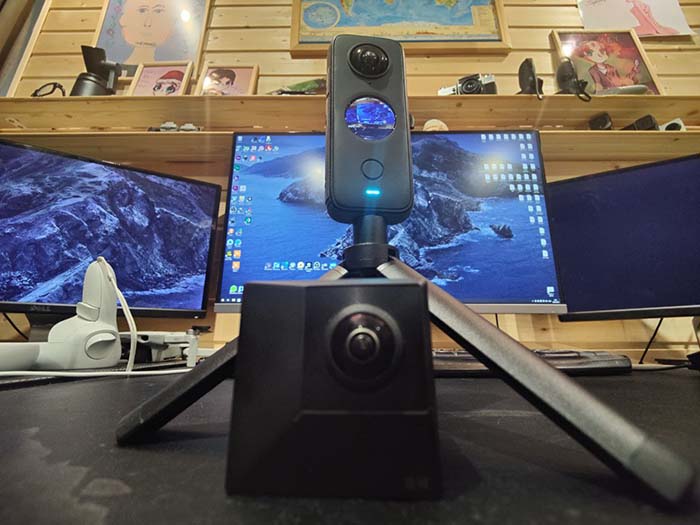
Insta360 EVO and Insta360 X2 tested. Other models should also work, but they need to be tested and confirmed.
Insta360 EVO can be connected only with Wi-Fi. Insta360 X2 can be connected with Wi-Fi or with USB cable.
I don't use Insta360 official SDK, i disagree with license restrictions.
Video instruction
Connection to camera
Wi-Fi connection
Just connect your PC Wi-Fi to Insta360 camera Wi-Fi network. Default password for EVO is 12345678, default password for X2 is 88888888.
Note: be carefull! The password on these Insta360 cameras cannot be changed even in the official app, so any of your neighbors can access your camera and, possible, to your PC if it connected to camera Wi-Fi. Discussion on Reddit
USB connection
- Switch USB mode on Insta360 X2 to "Android" (Swipe from up to down on Insta360 X2 display, swipe from right to left, click gears icon, menu "General" -> "USB mode", choose "Android")
- Connect your Insta360 X2 to PC with a standard USB-C cable.
- In some cases also need to instal WinUSB driver, follow next steps
- Download Zadig application
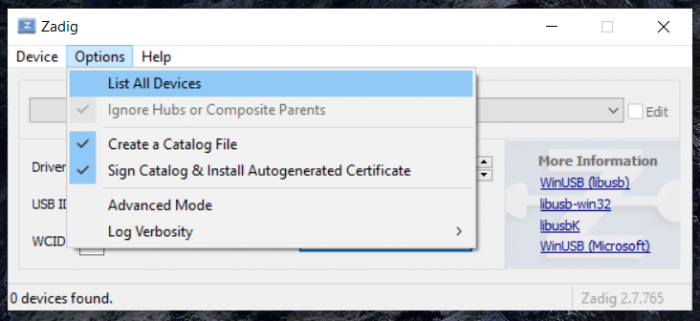
- Run Zadig and open menu Settings -> List All Devices
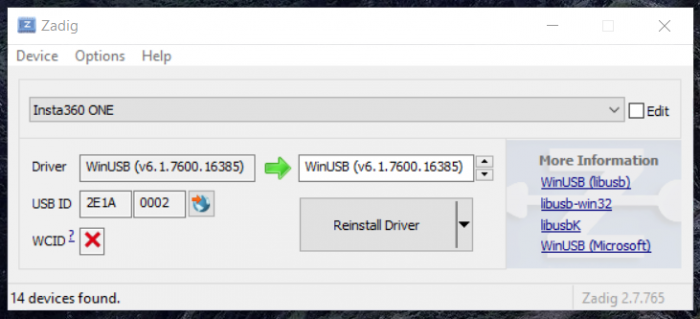
- Choose "Insta360 ONE" in list and click "Install driver" or "Reinstall driver" button
Configuring CosmoViewerNG
- Download CosmoViewerNG for Windows
- Run CosmoViewerNG application on PC
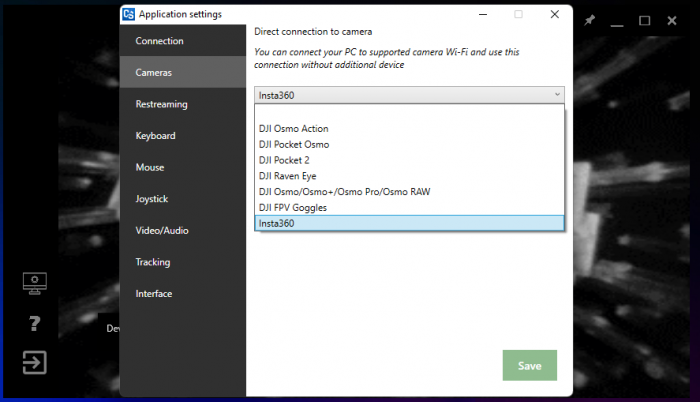
- Click "Application settings" icon (3rd icon from bottom in left panel)
- Go to chapter "Cameras". Choose "Insta360" in list and click "Save"
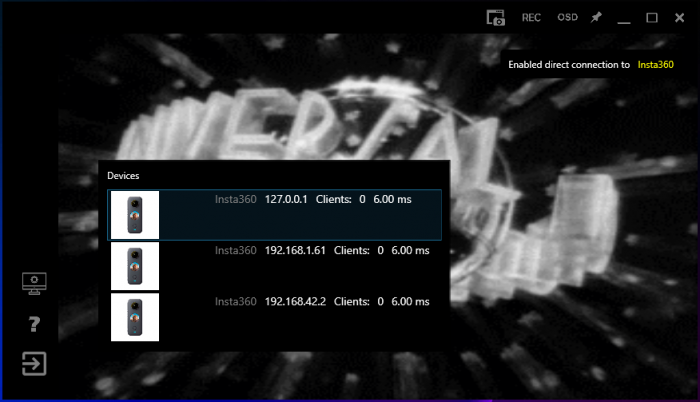
- One or more devices should be found in list (the same camera but on diffent network interfaces)
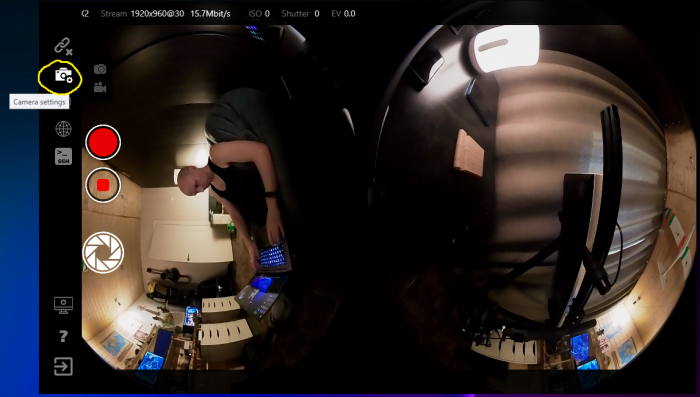
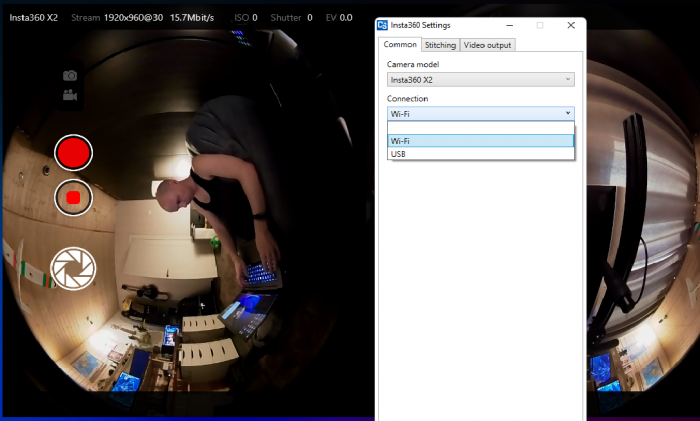
- Click any device (better to use device with address "127.0.0.1") and you should see video if camera already connected. Settings available as "gears" icon in left panel
- In settings change connection type (Wi-Fi or USB)
Changing preview resolution
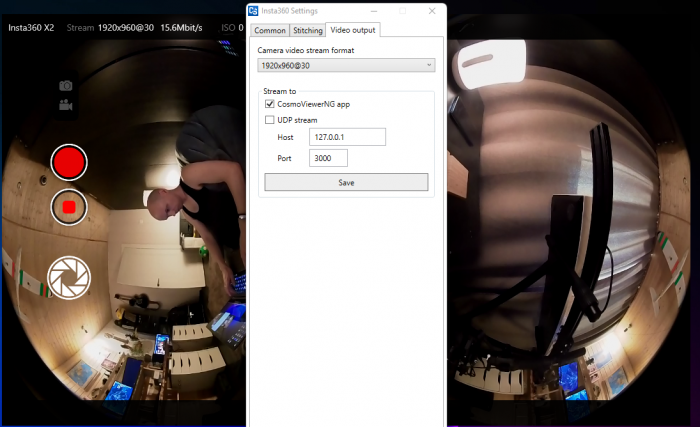
Click "Camera settings" icon, tab "Video output". Change resolution in list. Click on "Save" button is not needed
Real-time panorama stitching
NVidia graphics card ONLY (at current moment)
Most important feature - real-time stitching from two fisheyes into equirectangular format. It's strongly needed if you want to stream on Youtube. Unfortunately, Insta360 EVO and X2 does not support onboard stitching. Native Insta360 application can do stitching, but resolution is limited on 1280s. CosmoViewerNG can do stitching in 4K resolution (3840x1920) up to 60 FPS, but powerfull graphics card is needed for encoding stitched video in H264 codec. For example, my GTX 1650 SUPER is well fast for do 4K stitching on 30 FPS with a small latency, but in 60 FPS latency is big.
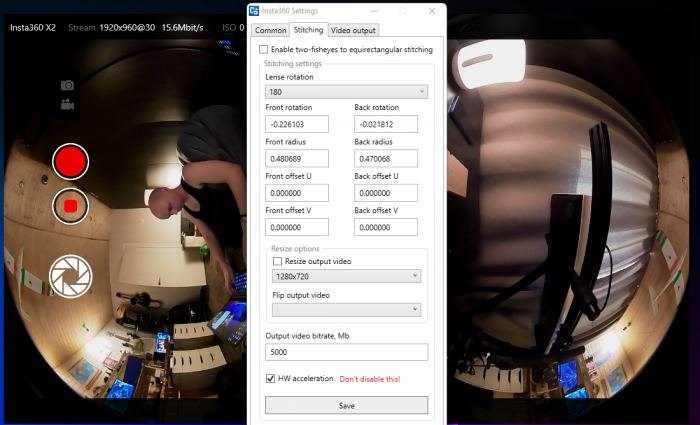
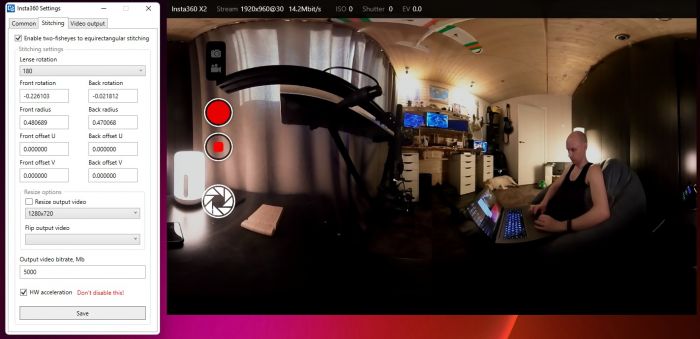
- Click "Camera settings" icon, tab "Stitching"
- Check option "Enable two-fisheyes to equirectangular stitching"
- Other params is by default for Insta360 X2 camera, don't change it if you are not sure what you do
- "Resize output video" is usefull for Youtube streaming, to correct video resolution
- "HW acceleration" strongly recommended. At current moment only NVidia graphics cards are supported.
- Click "Save" and you should see video in equirectangular format
Stitching details
I use Gstreamer glshader element to make stitching. GLSL shader from this repo https://github.com/izmhr/EquirectangularMapOnWebGL
Fragment shader file fisheye2eqrect.frag is placed in CosmoViewerNG installation directory, so you could change it if you want to do it better.
Stitching is not ideal yet, need to find better values. But it is already could be used.
RTMP live stream
For example, live stream on Youtube in 4K resolution (3840x2160).
- Configure Youtube live stream in Youtube Studio, create (or modify current) stream key with 4K resolution and bitrate 13-30 Mbit/s
- Connect Insta360 X2 or EVO to PC
- Run CosmoViewerNG and configure Insta360 camera connection params, as i described before
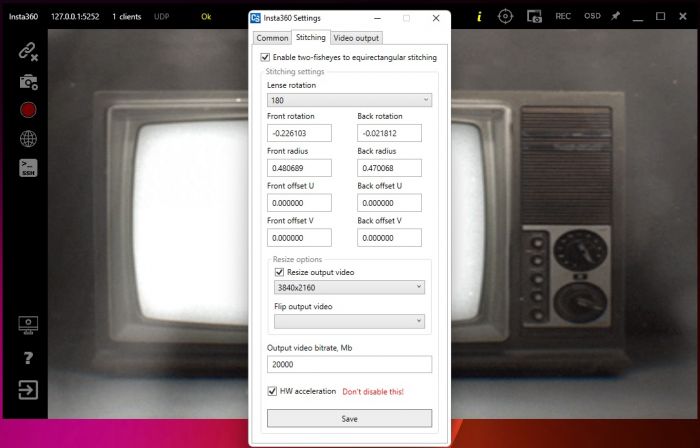
- Go to camera settings, tab "Stitching" and enable stitching. Use default params.
- Youtube don't like native video resolution with 2:1 aspect ratio, so turn on "Resize output video" option and choose resizing resolution option 3840x2160.
- Set output bitrate to 15000 (15 Mbit/s). You could use lower or greater value, 15000 is just for example.
- Enable "HW acceleration" option (only if you have Nvidia based graphics card)
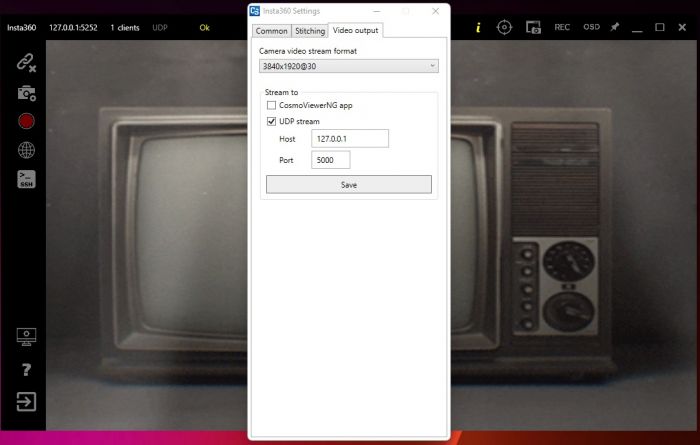
- In tab "Video output" set "Camera video stream format" to "3840x1920@30", disable "CosmoViewerNG app" option and enable "UDP stream", set Host 127.0.0.1 and Port 5000. Click "Save"
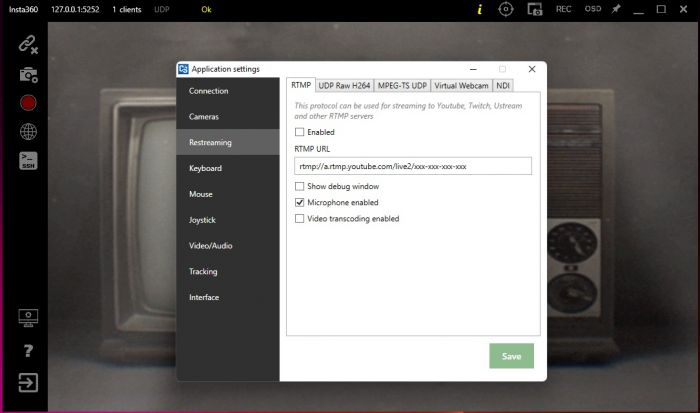
- Now open Application settings (3rd icon from bottom in left panel), chapter "Restreaming", tab "RTMP". Fill "RTMP URL" field with RTMP url and key (rtmp://a.rtmp.youtube.com/live2/YOUR_KEY)
- Turn on option "Microphone enabled". Default audio capture device will be used as audio source
- Don't enable option "Video transcoding enabled" !
- Also you could enable option "Show debug" to see what's happens
- Click "Save"
- Now you can turn on/off streaming by clicking checkbox "Enabled". Yes, not usefull, i'll add streaming panel on main screen, but later.
Hardware
Insta360 cams already supported in Cosmostreamer on Raspberry Pi and Nvidia Jetson. On Raspberry Pi stitching does not works, on Jetson - should work but not tested yet.
Back to CosmoViewerNG for Windows
